
by Cheryl Hill-Burrier
A True Southerner’s Delight.
I don′t care if you′re striking′ out on your own for the first time, updating your kitchen, or buying a present for a friend, figuring out which cookware produces the absolute best results without costing an arm and a leg is hard. There′s enamel, glass, ceramic, non-stick, stainless steel, copper-bottom, hard anodized, and “green”, which claims to be energy efficient and reduces carbon emissions. Huh? And then there′s Cast-Iron.
Now, Larry and I have tried quite a few types of pots and pans over the years because they sounded like something that would turn out really great meals regardless of our early cooking capabilities. In fact, one company even threw in a complete eight-place setting of dishes, wine glasses and flatware if we bought their pots and pans. I′ll admit that the stainless steel was pretty darn good as far as holding up, although a couple of pots became dented and eventually lost their handles.
The non-stick worked for a while, too, until the non-sticky stuff flaked off because I used metal utensils after accidentally melting the plastic spatulas and spoons that were required to keep from scratching them. Then, one Christmas our family broke into their piggy banks and bought us a really expensive set of cookware that was used by the “professionals”. They′re also nice and we still use them. In fact, we′ve never met a pot or pan that we truly didn′t like.
But the thing is, we Southerners are absolutely in love with our cast-iron, and on those occasions when Larry and I have strayed, we′ve always come back to our inexpensive, big old black cast-iron pots and pans that are even-cooking, non-stick, un-dented, handle intact, last forever beasts. We can fry, boil, bake or grill over a raging pit without damaging them. And because they′re seasoned right, all we do is lightly wash and dry them well, then put ′em away until the next meal. In fact, our cast-iron skillet is the only thing I′ll use for scrambling eggs because they don′t stick to the pan.
Ask just about any chef what they like to use most for searing or braising a fine cut of meat, or pan-frying soft-shell crab, and they′ll pull out their cast-iron because cast-iron evenly distributes the heat so food is cooked perfect every time, and the skillets can stand up to temperatures that would destroy other cookware.
And here′s the thing, you don′t have to make a major investment. Start out with a regular old 12-inch skillet for about twenty bucks (that′s dollars, not deer). Then, if you like it, and I know you will, you can get yourself a set that can include a variety of sizes like a 9-, 12- and 15-inch skillet along with a 5-quart Dutch oven and a 16-inch griddle for around a hundred dollars.
The only thing to know is that if your cast-iron doesn′t come pre-seasoned, you′ll need to take care of that, and it′s an easy process. Just scrub the insides really well, make sure they′re completely dry by heating them up. Then, after they cool down, lightly wipe them down with oils high in saturated fats like lard, Crisco, or coconut oil. Finally, placing them in a 400 to 500-degree oven for about 60-minutes. Allow the pan to cool and repeat the process at least one more time. The oil fills any pits or rounding of the pans, making them smooth and non-stick. Every time you cook, you′ll be seasoning the pan again, and it′ll be as good as any nonstick pan out there.
As far as we′re concerned, there′s no better cookware than cast-iron. And while even the economy can′t take the heat right now, here′s something that can at an affordable price. So go ahead and use a real metal spoon to scramble up those eggs or better yet, fire up the grill for the following Iron Skillet Grilled Roadkill Chicken recipe, dually pickup not required.
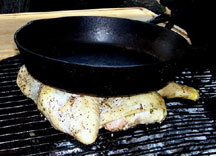
Iron Skillet Grilled Roadkill Chicken
The key to this recipe is placing a large cast-iron skillet on top of the chicken while it cooks. The skillet will not only keep the chicken flat on the grill but also help to evenly cook it on both sides.
Ingredients:
- 1/3 cup extra-virgin olive oil
- 8 medium garlic cloves (2-1/2 tablespoons minced)
- 1 teaspoon finely grated lemon zest
- 2 tablespoons fresh lemon juice
- 1/8 teaspoon red pepper flakes
- 3 teaspoons finely chopped fresh basil
- 3 teaspoons finely chopped fresh rosemary
- 4 teaspoons finely chopped fresh thyme
- 1 tablespoon sea salt
- 1 teaspoon ground black pepper
- 1/4 stick (2 tablespoons) butter, melted
- 1 3-3/4 to 4-1/4 pound whole chicken
- Vegetable oil to prepare grill rack

Preparation:
- Using a small saucepan, combine olive oil, butter, garlic, lemon zest and red pepper flakes over medium-low heat and bring to a simmer, stirring constantly for about 2 minutes.
- Add 3 of the 4 teaspoons of thyme and 2 of the 3 teaspoons rosemary to the mixture and simmer for an additional 30 seconds.
- Remove from heat and strain the liquid into a bowl while using your fingers or the back of a spoon to press on the solids so that all oils are removed.
- Pour the solid ingredients into a bowl and set aside to cool.
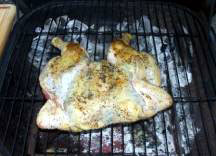
- Butterfly the chicken by using cooking shears to cut along each side of the backbone and remove it.
- Turn the chicken over and press the breastbone down with your hands, flattening it.
- Turn the wings and tuck them behind the back.
- Using your fingers, loosen the skin over the breast & thighs, and remove any excess fat.
- You′re now ready to place solid seasonings beneath the skin.
- Combine together in a small bowl the sea salt and black pepper.
- Measure out 3 teaspoons of this mixture and stir into the bowl of cooked solid ingredients.
- Evenly distribute this spice mixture under the skin of the chicken.
- Turn chicken over (bone side up) and sprinkle with remaining sea salt and pepper.
- Place chicken (skin side up) onto a tray and refrigerate for 1 to 2 hours.
- Fill outdoor cooking grill with charcoal and light the fire, allowing it to burn for about 15 minutes, then close the grill lid and allow an additional 5 minutes heating.
- Open the lid and place the cooking grate over the coals. Set the iron skillet on top of the grate to preheat.
- Using an oven mitt, remove the skillet and set aside.
- Using kitchen tongs, dip a folded up paper towel in vegetable oil and coat the cooking grate well.
- Test your grill temperature by holding your hand about 5 inches from the grate. If you can only hold it there for 3 or 4 seconds, the grill should be medium-hot and ready to cook.
- Remove the cooking grate from the grill and shovel the coals to one side of the grill, then replace the grate.
- Set your chicken (skin side down) on the grate with the legs positioned toward the coals. (The leg meat cooks slower so this will ensure even cooking.)
- Now set your hot cast-iron skillet on top of the chicken and close the lid on the grill.
- Cook for about 22 to 25 minutes. Skin should be lightly browned.
- Lift off the skillet and using a spatula, loosen the chicken from the grate, lift up and turn over with the bone side down, legs still toward the coals.
- Replace the skillet on top of the chicken, close the grill lid and cook for about 12 to 15 minutes until well browned.
- While cooking, whisk together the 2 tablespoons of lemon juice with the remaining teaspoon of thyme and teaspoon of rosemary, along with the bowl of liquid ingredients and remaining spice solids mixture and set aside.
- Check the chicken for doneness by inserting a meat thermometer into the thigh. Meat is done when the temperature reaches 165°F.
- Remove the chicken to a cutting board, pour the lemon juice mixture over the top and sides, and cool for about 10 minutes.
Serves 4.
Olive Oil, Tomato & Herb Pasta
Ingredients:
- 1 cup butter, melted
- 1/2 cup virgin olive oil
- 3 garlic cloves, finely chopped
- 2 Roma tomatoes, finely chopped
- 1 teaspoon finely chopped fresh basil
- 1/2 teaspoon finely chopped fresh oregano
- 1/2 teaspoon finely chopped fresh tarragon
- 1 pound thin spaghetti noodles
Preparation:
- In a small saucepan, mix all ingredients together and simmer over medium heat for 2 to 3 minutes.
- Toss sauce and noodles together in a bowl and serve as a meal or side dish.
Serves 4.
More Articles
- How to Make Flour Tortillas
by Patricia Mitchell - How to Make Corn Tortillas
by Patricia Mitchell - Chicken for Dinner
- How to Make Beef Machaca
by David Bulla - Recipe: Recipe: Chicken Fried Steak
- Recipe: Recipe: Pineapple Upside-Down Cake